Sunday, 17 February 2019


Κόψαμε το πίττα μας για το 2019 και είχαμε ένα υπέροχο βράδυ! 

Θα θέλαμε να ευχαριστήσουμε όλες τις υπέροχες κυρίες που ήρθαν για να μοιραστούν μαζί μας την βραδιά. Γιορτάσαμε επίσης και τα τρία χρόνια Fiona's Craft Emporium και σας ευχαριστούμε από τα βάθη της καρδιάς μας για την υποστήριξη και την αγάπη που έχετε δώσει στο μικρό μας κατάστημα κατά τα τελευταία τρία χρόνια! 

Ξεκινήσαμε το βράδυ με μια παρουσίαση του Art Premium Rust Effect και δημιουργήσαμε ένα πολύ σκουριασμένο Πασχαλινό αυγό Steampunk το οποίο το κέρδισε στη συνέχεια η Νίκη στην κλήρωση! 

Τα φλουριά κέρδισαν η Ασιμίνα και η Δήμητρα, οι οποίες κέρδισαν απο ένα σεμινάριο της επιλογής τους αξίας 25,00 Ευρώ. 

Άφθονο ζεστό κρασί, σνακ και γλυκά και φυσικά την υπέροχη πίττα που μας έφτιαξε η Χριστίνα έκανε το βράδυ πραγματικά ξεχωριστό. 

We cut our pitta for 2019 and we had a lovely evening! 

We would like to thank all the lovely ladies who came along to share the evening with us. We also celebrated three years of Fiona's Craft Emporium and we thank you all from the bottom of our hearts for the support and love that you have given our little shop over the past three years! 

We started off the evening with a presentation of the Art Premium Rust Effect and we created a very rusty Steampunk Easter egg which was then won by Niki in the raffle! 

The lucky coins were won by Asimina and Dimitra who each won a seminar of their choice valued at 25,00 Euro. 

Plenty of mulled wine, snacks and sweets and of course our lovely pitta which was made by Cristina all made the evening really special.


Thursday, 25 October 2018

Χειροτέχνες εν δράσει...: Βραχιόλια από πλαστικά μπουκάλια!! Οδηγίες+Video!

Χειροτέχνες εν δράσει...: Βραχιόλια από πλαστικά μπουκάλια!! Οδηγίες+Video!: Είχατε σκεφτεί ποτέ οτι μπορείτε να φτιάξετε και βραχιόλια από πλαστικά μπουκάλια; Πολύχρωμα βραχιολάκια σε διάφορα μεγέθη που...

Saturday, 21 July 2018

Going back to simplicity - Επιστροφή στην απλότητα

In an age where there are so many new products and different techniques to try sometimes we can lose touch with the effortless simplicity of a simple creation using a little decoupage, some acrylic paint and a discreet stencil.

Σε μια εποχή όπου υπάρχουν τόσα πολλά νέα προϊόντα και διαφορετικές τεχνικές για να δοκιμάσουμε, μερικές φορές μπορούμε να χάσουμε την επαφή με την απλότητα - μιας απλής δημιουργίας χρησιμοποιώντας απλά λίγο ντεκουπάζ, λίγα ακρυλικά χρώματα και ένα διακριτικό στένσιλ.


I made these little canvases using rice paper decoupage, acrylics and various stencils to add some interest. I then finished off with a couple of coats of varnish and they are ready! 

Έφτιαξα αυτά τα μικρά καρτελάκια με ριζόχαρτο ντεκουπάζ, ακρυλικά χρώματα και διάφορα στένσιλ για να προσθέσω κάποιο ενδιαφέρον. Στη συνέχεια τελείωσα με βερνίκι και είναι έτοιμα!


Perfect for little gifts, so simple but so pretty......

Υπέροχη ιδέα για μικρά δωράκια, τόσο απλά αλλά τόσο όμορφα ......


Wednesday, 9 May 2018

Ανακαίνιση της τραπεζαρίας - Refurbished dining room furniture

Είμαι πολύ ενθουσιασμένη! Ολοκλήρωσα την ανακαίνιση τής τραπεζαρίας της πεθεράς μου για το σπίτι μας!
Ποτέ δεν μου άρεσε αυτά τα έπιπλα που μας έδωσε η πεθερά με το βαρύ, σκόυρο χρώμα του ξύλο και τα παλιομοδίτικα, βελούδινα καθίσματα, αλλά ήξερα ότι
θα μπορούσε να γίνει πολύ όμορφο και ήξερα ακριβώς τι ήθελα να δημιουργήσω.

I am absolutely thrilled! I have finally completed the refurbishment of my mother-in-law's old, seventies dining room furniture for my dining room.

I had never liked this furniture which my mother-in-law had handed down to us with its heavy, dark wood and old fashioned, velvet upholstered seats, saggy springs etc but I knew that that there was hidden potential and I knew exactly what I wanted to create.


Chair "before"

Table "before"
Έβαψα τα έπιπλα στο ίδιο υπέροχο χρώμα Eggshell το οποίο είχα χρησιμοποιήσει στο παρελθόν, όταν είχα φτιάξει δύο διακοσμητικές καρέκλες για την είσοδο μας. Χρησιμοποίησα επίσης Vanilla Cream για να τονίσω τα ανάγλυφα στοιχέια στην βάση του τραπεζιού και στα πόδια της καρέκλες.

I painted the furniture in the same lovely egg shell which I had used previously, when I had refurbished two decorative chairs for our entrance. I also used vanilla cream to highlight some of the carvings in the beautiful wooden base of the table and on the chair legs.


Base of the table "after"


Για να ολοκληρωθεί η ανακαίνιση επέλεξα ενα όμορφο ύφασμα σε κρέμ με βαθύ κόκκινες ρίγες που χάρισε στής καρέκλες μια νέα, κομψή εμφάνιση.

To complete the refurbishment I chose a beautiful cream fabric with deep red stripes which gave the chairs a fresh, elegant look.


Front of chair "after" 


Back of chair "after"


Table "after" 
Νομίζω ότι θα συμφωνήσετε ότι αξίζει τον κόπο, τοω χρόνου και την προσπάθεια - απλά κοιτάξτε τα - φρέσκο, κομψό και πολύ, πολύ άνετα.....
 
I think that you will agree that it was well worth the time and effort involved - just look at the finished furniture - fresh, elegant and very, very comfortable.....


Από παλιά και ανεπιθύμητα... From old and unloved...

Ίσως να θυμάστε ότι είχα κάνει μία ανάρτηση για δύο καρέκλες που είχα βρέι εγκαταλειμμένο στην άκρη του δρόμου που θα ήθελα να τα ανακαινίσω. Λοιπόν, έχω ολοκληρώσει τελικά τη δουλειά και θα ήθελα να μοιραστώ μαζί σας μερικές φωτογραφίες από τη διαδικασία.
Αρχικά σκόπευα να κρατήσω το φυσικό χρώμα του ξύλου, αλλά ερωτεύτηκα ένα πανέμορφο χρώμα κιμωλίας Eggshell που ήξερα ότι
θα ταιριάζει απόλυτα με το ύφασμα που ειχα πάρει για να της ταπετσάρω.

You may recall that I had posted about a set of chairs that I had found abandoned by the roadside which I wanted to re-upholster. Well, I have finally completed the job and I'd like to share with you some photos of the process.

I originally intended to keep the natural color of the wood but I fell in love with a gorgeous "eggshell" chalk paint that I knew would look fabulous with the damask material so I decided to paint the chairs, thus giving them a total make over.


Before
Once the old upholstery was removed the wood was lightly sanded to provide a base for the paint
"eggshell" chalk paint and damask material


The foam seating and arm rests were replaced
The deep buttoning process is done by hand and each diamond shape is individually created to achieve the perfect alignment required.
The completed chair


Before and after

Monday, 23 March 2015

Μεταμόρφωση μίας μεταλλικής βαλίτσας - Vintage Metal Trunk Makeover

Πάντα ήθελε μία από αυτές της όμορφες, vintage μεταλλικές βαλίτσες και είχα πρόσφατα αποφασίσει να βρω μία από τα παλιατζίδικα στην Αθήνα. Λοιπόν, φανταστείτε την έκπληξή μου όταν πήρα το σκυλί μου για το απογευματινό της βόλτα και βρήκα μία υπέροχη βαλίτσα στο κάδο απορριμμάτων κοντά στο σπίτι μου.
Όπως μπορείτε να μαντέψετε, το σκυλί πήγε πίσω στον κήπο, ώστε να μπορώ να τρέξω για να παρώ την βαλίτσα!


Παρά το γεγονός ότι ήταν πολύ σκουριασμένο, ήταν σε εκπληκτικά καλή κατάσταση έχοντας όλες της μεντεσέδες άθικτα.
Δυστυχώς, δεν τράβηξα καλές "πριν" φωτογραφίες και είχα ηδη βάψει το καπάκι με το πρώτο χέρι και είχα βγάλει το σάπιο χαρτίνο επένδυση προτού αρπάξω τη φωτογραφική μηχανή για να
τραβήξω μία "πριν " αλλά τουλάχιστον μπορείτε να δείτε πόσο σκουριασμένο ήταν......

I've always wanted one of those lovely, old, vintage metal steamer trunks and I had recently decided to try to find one from the local junk shops here in Athens. So, imagine my surprise when taking my dogs for their afternoon walk, I came across a fabulous old trunk dumped next to the rubbish bin near my house.

As you can guess, the dogs were taken back to my garden so that I could run to rescue the trunk before some other like minded person came by and grabbed it before me!!

Despite it being very rusty, it was in surprisingly good condition having all it's hinges intact and not really banged up.

Unfortunately, as usual I was a bit remiss about taking good "before" pictures and I had already painted the lid with the first coat and I had stripped off all the smelly, rotten, paper lining before I grabbed my camera to take a "before" shot, but at least you can see how rusty the case was.....


Αποφάσισα να χρησιμοποιήσω  χρώματα κιμωλίας για να βάψω την βαλίτσα κατευθίαν χωρίς αστάρι. Έτριψα τη σκουριά με γυαλόχαρτο ώστε να είναι πιο ομαλή. Μετά την έπλυνα καλά για να αφαιρέσω τη σκόνη και την σκουριά και έπειτα έβαψα την βαλίτσα με δύο χερία τιρκουάζ κιμωλία.
Μόλις στέγνώσε η δεύτερη στρώση έβαλα λίγο κερί στις περιοχές που ήθελα να παλαιώσω.
Χρησιμοποίησα ένα οραίο πράσινο κιμωλία για να βάψω πάνω απο το τιρκουάζ.

 
I decided to use chalk paint to paint the trunk as chalk paint goes on really well over rust. I didn't prepare the case at all, other than sandpapering the rust to make it smoother. I washed the trunk well to remove the dust and any loose rust and then I painted on two coats of a lovely turquoise chalk paint.

Once the second coat was dry I applied some furniture wax to the areas where I wanted to distress the top coat.

I used a vintage green top coat which complimented beautifully the turquoise under coat.


I painted and distressed all the clasps and even the handles


Το εσωτερικό της βαλίτσας ήταν ξύλο και δεν ήθελα να το βάψω. Αντ 'αυτού προτίμησα να περάσω κασια σε καρυδιά. The interior of the trunk is wood and I didn't want to hide the wood by lining the trunk again. Instead I preferred to stain the wood a lovely walnut which really goes well with the distressed vintage green of the exterior.


Είμαι πολύ ενθουσιασμένη με το πώς έγινε και τώρα ειναι στην τραπεζαρία μας και αποθηκεύει όλα τα άλμπουμ φωτογραφιών μας!

I'm thrilled with the way the trunk turned out and it now has pride of place in my dining room and it stores all of our photo albums.

Friday, 29 November 2013

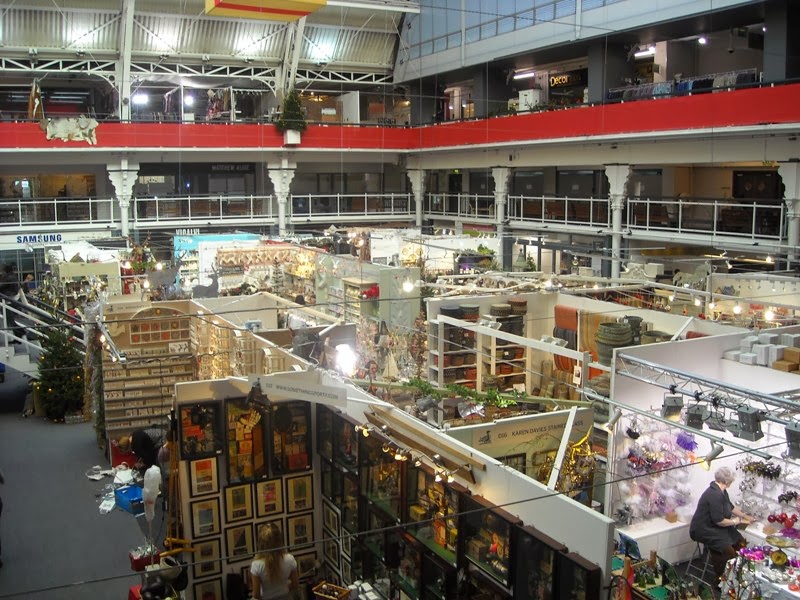
2013 London Country Living Christmas Fair

While I was in London last Christmas, I thought that it would be fun and also really interesting to participate at a London Christmas fair and I really liked the idea of taking part in the 2013 London Country Living Christmas Fair which would be taking place from 30th October until 3rd November. So I decided to go for it and I submitted my application form in February and to my great joy I was accepted!  

I knew that I would need to work really hard to prepare enough merchandise to sell at the fair. I had nine months in which to create a diverse and plentiful selection of housewares ranging from tea boxes, serving trays, jewellry boxes, decorative signs, storage boxes and key holders etc.


Apart from creating my merchandise, I also needed to work my way through their huge exhibition manual so that I could comply with the various requirements expected of me as an exhibitor. Plus I needed to make the arrangements for the delivery of what would be a pallet from Greece to the UK and arrange my own flights. I also needed to enlist the help of my very good friend Stella, with whom I would be staying, to turn her house upside down in order to find me props for my stand. Coming from Greece all I would have by way of stand decor were my exhibition panels and shelves. Also in addition to all the paperwork, I had press packs to prepare to promote my business, which would include press releases etc. So I really had my work cut out for me!
 
Before long, it was time to send my pallet to the UK and I sent it off terrified that it would either get lost or my merchandise would be damaged etc....two weeks later, it was my turn to fly to London.

Now I was getting seriously excited about the fair! Opening day was on the Wednesday and Tuesday was set up day. I was on tenterhooks waiting for my pallet to be delivered. The exhibition center was huge, a really amazing building and it was absolutely chaotic with all the exhibitors unloading their merchandise and setting up their stands. Stella had come up trumps and found me a vintage trunk, a vintage suitcase, several wicker baskets and old wine crates. So armed with these props, plus my panels and shelves (which had arrived safe and intact along with my merchandise) I set about trying to create a warm, attractive and inviting stand. Of course I could not hope to compete with the other exhibitor's stands as they had the luxury of bringing complete showrooms with them and the majority of the stands were absolutely stunning! But as you can see from the pictures I think I managed to do a good job and judging from the comments of the visitors,  they liked my stand too.


 From the minute the fair opened every morning right through until closing time, the exhibition center was packed. I was really lucky to have some lovely neighbors who were more than happy to keep an eye on my stand for me when I needed to grab a coffee or go for a five minute break.

The Gala evening, which was held on the Thursday was nice - there were plenty of customers but the pace was much slower and more relaxed and there was the added bonus of several waitresses wondering around with trays full of complimentary glasses of wine, which needless to say I took advantage of.


All in all I was thrilled that the fair went very well for me. I got terrific feedback about my work which almost sold out (I returned with just two boxes) and I came back home to Greece with clear ideas as to how I want Fiona's Creations to proceed and I'm looking forward to the New Year with lots of new ideas and plans for the future.


Friday, 24 May 2013

Repousse Peacock Jewelry Box


Today, I wanted to share with you my tutorial which was included in a recent issue of the "Dialogue," the periodical magazine sent out by Decoupage Artists Worldwide to their members.

You can see more examples of my repousse decoupage boxes at my Etsy shop HandmadeByFiona